Flat back earrings offer a sleek and secure style, but removing them can feel tricky, especially for first-timers. Struggling to take them off can lead to discomfort, tugging, or even minor injuries if done incorrectly.
Understanding the right technique ensures a smooth, pain-free experience and protects both your ear and the earring. Simple tools, proper hand placement, and gentle pressure make the process safer and faster than you might expect.
Some flat back earrings come with push-on backs, while others use screw-on designs, requiring slightly different approaches. Knowing these differences helps prevent accidental damage to the jewelry and your piercing.
Taking a calm, steady approach minimizes stress and keeps your earrings looking new. With a few practical steps and a bit of patience, removing flat back earrings becomes a quick and effortless part of your daily jewelry routine. Safe and easy removal starts here.
How to Remove Flat Back Earrings?
Flat back earrings are simple, stylish, and comfortable. Their flat disc rests against the ear, keeping the earring close and secure. Sometimes, removing them can feel tricky, especially for new piercings. This guide explains clear and safe methods to take out flat back earrings without pain or damage.
Understanding Flat Back Earrings
Flat back earrings are different from traditional earrings with butterfly or screw backs. They have a straight post and a flat disc at the back. This disc holds the earring in place.
Types of Flat Back Earrings
-
Push-on flat backs – The disc pushes onto the earring post and stays tight.
-
Screw-on flat backs – The disc twists onto the post and locks in place.
Knowing the type helps in choosing the right removal method. Pushing works for one type, twisting for the other.
Why Careful Removal Matters
The skin around your piercing is soft and delicate. Rough removal can cause:
-
Pain or irritation
-
Redness or swelling
-
Small cuts or scratches
-
Infection risk
Gentle handling keeps your ears healthy and earrings intact.
Step-by-Step Guide to Remove Flat Back Earrings
Step 1: Wash Your Hands Thoroughly
Dirty hands can carry germs into your piercing. Use soap and warm water. Rub your hands for 20 seconds and rinse well. Dry with a clean towel.
Step 2: Soften the Piercing Area
Flat back earrings fit tightly. Softening the skin makes removal easier.
-
Apply a drop of warm water around the earring.
-
Gently massage the earlobe to relax the tissue.
-
Baby oil or coconut oil can also help loosen the backing.
-
Wait 1–2 minutes for the skin to soften.
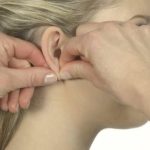
Step 3: Hold the Front of the Earring Firmly
Grasp the decorative front with one hand. Hold close to the ear to avoid bending the post. Keep a steady grip to control the movement.
Step 4: Remove the Flat Back
For Push-on Flat Backs:
-
Place your fingers or a tissue on the flat disc.
-
Push slightly while pulling the front of the earring forward.
-
Slide it off gently.
For Screw-on Flat Backs:
-
Grip the flat disc carefully.
-
Twist counterclockwise slowly.
-
Once it loosens, pull the earring forward.
Step 5: Handle Stubborn Earrings
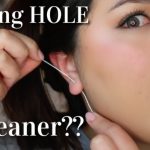
Some earrings stay tight even after these steps. Use extra tools carefully:
-
Cotton ball or tissue – Wrap around the disc for better grip.
-
Jewelry pliers – Wrap in soft cloth to prevent scratches.
-
Soak the ear in warm water for 5–10 minutes before retrying.
Step 6: Clean the Piercing After Removal
Clean the area immediately to prevent infection:
-
Use a mild saline solution or antiseptic.
-
Dab gently with a clean cotton pad.
-
Avoid alcohol; it dries out the skin.
-
Let the ear air dry before wearing new earrings.
Extra Tips for Safe Removal
-
Remove earrings slowly. Sudden pulling can hurt.
-
Store earrings in a small, clean container.
-
Avoid touching the piercing with dirty hands.
-
Check earrings for damage. Replace bent backs to prevent irritation.
-
Remove earrings before heavy activities like swimming or sports to avoid injury.
Common Problems and Solutions
Earring Feels Stuck
Soak the ear in warm water for 5–10 minutes. Apply a few drops of baby oil. Twist or slide the earring gently.
Pain or Redness After Removal
Use a cold compress for 5 minutes. Apply a small amount of antiseptic cream if needed. Avoid touching or scratching.
Flat Back Bending or Damaging
Flat backs can bend if you pull too hard. Replace the disc with a new one to keep earrings safe and secure.
Sensitive or New Piercings
New piercings need extra care. Avoid forceful removal. Use saline solution daily and wait for the piercing to heal fully before changing earrings.
Final Thoughts
Removing flat back earrings safely protects your ears and your jewelry. Understanding the type of backing and using gentle steps prevents pain and irritation. Regular cleaning keeps your piercings healthy. Patience and care make the process simple and stress-free. Following these methods ensures a smooth experience every time.
FAQs
1. Can I remove flat back earrings myself?
Yes. Most flat back earrings can be safely removed at home using gentle steps and clean hands.
2. How do I know if my earring is push-on or screw-on?
Push-on backs slide onto the post easily, while screw-on backs twist into place. Twist the disc gently to check.
3. What if my piercing hurts or swells after removal?
Use a cold compress and clean with saline solution. Avoid touching the area to reduce irritation.
4. Can I use tools like pliers?
Yes, but wrap tools in soft cloth to avoid scratching or bending the earring.
5. How can I prevent earrings from getting stuck?
Keep earrings clean, remove them gently, and avoid force. Softening the area before removal helps a lot.