
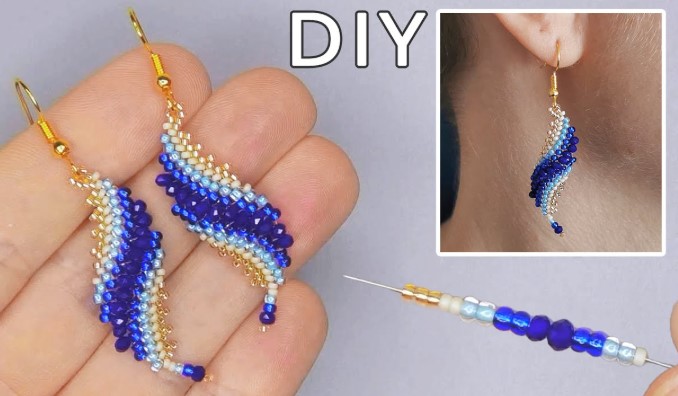
Beaded earrings offer a perfect way to express personal style and add a pop of color to any outfit. Crafting them at home gives the freedom to experiment with shapes, patterns, and materials that suit your taste.
Simple tools like pliers, wire, and a variety of beads can turn into stunning accessories with just a little attention to detail. This guide walks through essential steps, tips, and tricks to help beginners design earrings that feel professional and unique.
Exploring different bead types, arranging colors thoughtfully, and understanding basic techniques unlock countless creative possibilities. Handmade earrings also make heartfelt gifts that carry a personal touch, showing effort and care in every piece.
Each project can become a small adventure in style, patience, and creativity. Dive into the world of beaded earrings and discover the joy of crafting something beautiful with your own hands.
How to Make Beaded Earrings?
Beaded earrings give any outfit a personal touch. Handmade earrings feel special and unique. They also save money compared to store-bought ones. Simple tools, a few materials, and patience are enough. Even beginners can create stylish earrings with step-by-step guidance.
Materials Needed
Gather all materials before starting. Using good quality tools makes the process easier and safer.
-
Beads: Glass beads give shine, wooden beads give natural looks, and plastic beads are lightweight. Pick colors that match or contrast nicely.
-
Earring hooks: Silver, gold, or nickel hooks attach your beads to your ears. Some hooks have a small loop; some need a jump ring.
-
Beading wire or thread: Thin wire gives structure; strong nylon thread is flexible. The wire keeps the earring shape intact.
-
Jump rings: Small metal rings connect beads or charms to the hook. Choose the right size for your beads.
-
Pliers: Round nose pliers shape loops. Flat nose pliers hold and bend wire. Chain nose pliers help open and close jump rings.
-
Wire cutters: Cut wire cleanly without fraying.
-
Optional items: Bead stoppers to prevent beads from falling, small bead mats to keep beads from rolling away.
Extra tip: Organize beads by color, size, and type in small containers or trays. It helps save time and avoids mistakes.
Steps to Make Beaded Earrings
Follow these steps carefully. Taking your time creates neat and balanced earrings.
Step 1: Plan Your Design
Decide on your earring shape. Common shapes: straight line, teardrop, hoop, or cluster. Draw a rough sketch of bead placement.
-
Choose the number of beads.
-
Decide bead order and colors.
-
Beginners can start with a simple single-line design.
Extra advice: Test different color combinations before starting. Sometimes colors look different in natural light.
Step 2: Cut the Wire or Thread
Cut a piece of wire about 3–5 inches long, depending on earring size.
-
Leave extra length for loops.
-
A longer piece is easier to work with.
-
For thread, double it for strength if beads are heavy.
Tip: Straighten wire slightly by rolling it on a flat surface before starting. It makes threading easier.
Step 3: String the Beads
Slide beads onto wire or thread one by one.
-
Start from the center for symmetrical designs.
-
Check spacing; leave small gaps if needed for style.
-
Experiment with patterns like alternating colors or bead sizes.
Extra advice: Use a bead stopper at one end to prevent beads from sliding off. Small clips or tape work too.
Step 4: Make a Loop at the Top
Use round nose pliers to bend wire at the top of the bead strand.
-
Make a small, neat loop to attach the earring hook.
-
Wrap the extra wire around the base of the loop to secure beads.
-
Check the loop closes tightly so beads do not fall off.
For thread, tie a strong knot and add a small dab of clear jewelry glue for security.
Step 5: Attach Earring Hook
Open a jump ring using flat nose pliers.
-
Hook it through the top loop.
-
Attach it to the earring hook.
-
Close the jump ring tightly by twisting ends together.
Tip: Avoid pulling the hook while closing the jump ring. It can bend the wire or stretch the design.
Step 6: Finish and Adjust
Examine the earring carefully.
-
Make sure beads hang straight.
-
Cut any extra wire.
-
Smooth sharp ends with pliers.
-
Check weight; earrings should feel balanced and comfortable.
Extra touch: Add small charms or dangles for variety. Combine different bead shapes for texture.
Tips for Better Beaded Earrings
-
Use lightweight beads for comfort. Large beads can make earrings heavy.
-
Limit color variety in a single earring for a cleaner look.
-
Match patterns on both earrings carefully.
-
Store finished earrings in soft boxes to prevent scratches.
-
Practice knotting and loop-making on spare beads before starting your main project.
Extra advice: Try mixing bead textures, like matte and shiny, for a unique effect.
Common Mistakes and How to Avoid Them
-
Beads falling off: Secure loops tightly and use stoppers.
-
Uneven earrings: Always measure beads and wire before making loops.
-
Wire kinks: Straighten wire before starting and handle gently.
-
Overcrowding beads: Leave some space between beads; overcrowding looks messy.
FAQs About Beaded Earrings
Q1: Can beginners make earrings?
Yes. Start with simple designs and practice small patterns.
Q2: Which beads are best?
Glass and wooden beads are popular. Use lightweight beads for comfort.
Q3: How long does it take to make a pair?
Simple designs take 20–30 minutes. Complex designs may take 1–2 hours.
Q4: Can thread replace wire?
Yes, strong nylon or polyester thread works. Larger bead holes help.
Q5: How to keep earrings strong?
Secure loops tightly. Check jump rings and knots before wearing.
Conclusion
Beaded earrings give personal style and creativity. Simple tools and patience create beautiful, wearable designs. Experiment with colors, shapes, and patterns. Handmade earrings offer uniqueness and charm. Regular practice improves skill, making earrings look professional.